There are many reasons to pay workers for only some of the work that they have done. To read some sample scenarios, go to the overview of the payroll process topic.
You can always manually select and deselect which workers or entries you would like to be included in the next payroll batch. Click the plus sign next to any worker and you will see all the entries below that worker. Select the ones you wish to include the next Payroll Batch, and deselect the ones you wish to exclude.
Your selections will not be saved when you leave the payroll screen. If you plan to use your selections to create a new Payroll Batch, make sure to click

button before you leave the payroll screen.
Sorting Unpaid Items
To sort, click on the header for any of the following fields: worker, hours, total (total dollars). The first time you click on a header, the list will be sorted in ascending alphabetical order (a->z) based on the column you clicked, and the second time you click the same column, the list will sort in descending order. Every time thereafter, will toggle between the two.
If you are changing sorts between multiple columns, keep in mind that clicking on another column will reset all other columns to sort ascending the next time they are clicked.
Filtering Unpaid Items
The filter form allows you to narrow down the items you wish to pay based on common criteria. Generally you will want to use the filter form to pay a subset of items, but keep in mind that if you have exceeded the max number of records enabled for display, as set by you or another administrator in performance settings, you will need the filter to seek out older records.
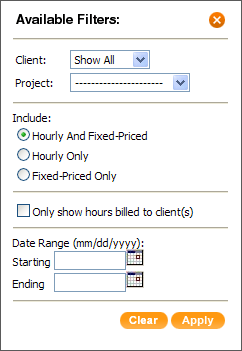
 Filter
 Filter Form:
There are a variety of approaches and methods you can use when doing payroll. Below are some common methodologies.
Approach 1 - paying specific workers: Using this approach, you wouldn't need the filter form at all. Simply select the workers you wish to pay in the unpaid items area, leaving the rest deselected.
Approach 2 � paying workers after you've billed your clients: This option is useful if you want to pay only the hours you've billed to clients.
Approach 3 � paying workers at regular intervals: Using this approach, you would filter based on a range of dates.
You don't have to actually pay the worker when you create a payroll batch. For example, you can create payroll batches throughout the month, and then pay your workers at the end of the month.
As you can see there are many different approaches to organizing your payroll, and the filtering features allows you to execute all of these approaches, as well as any other method you deem is appropriate for running your business. Below is a breakdown of all the filtering options:
Include: You must choose between hourly and fixed-priced, hourly only, or fixed-price items only.
Only show hours billed to client(s): This option is useful if you want to make sure not to pay a worker unless you've billed the client. Checking this option will eliminate any entries that have not been included in a bill batch.
Client: Select a client from your list of active clients. Once selected, the project drop-down box will fill with choices for the projects that client has.
Project: You will need to select a client from the drop-down list. Once selected, the project drop-down box will fill with choices for the projects that client has.
Date Range (mm/dd/yyyy): The date range option allows you to enter a beginning date, an ending date, or both a beginning and end date. If you only enter a beginning date, it will show unbilled items beginning from that date, without limiting the end date. If you only put in an end date, it will show the unbilled item up until that date without limiting the beginning date. This option applies to the date of the item, not the date that the item was entered.