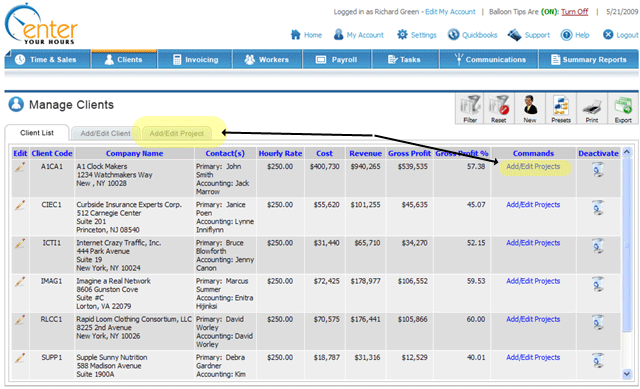
From the the Client Screen, there are two ways you can access the Projects and Activities screen for adding, editing, and deleting projects and activities.
Manage clients screen:

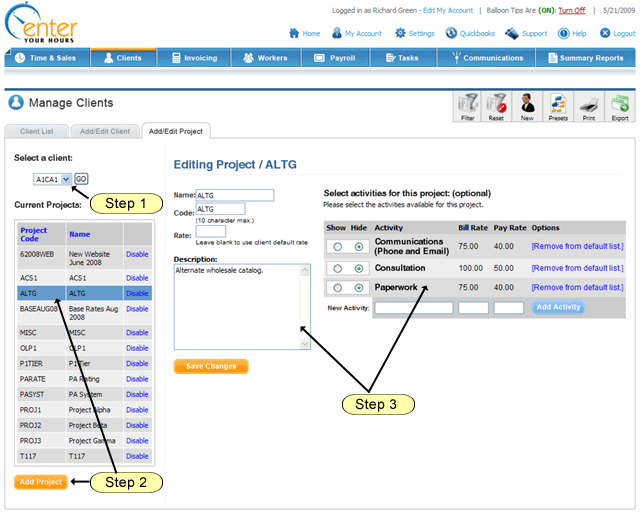
On the Project and Activities screen you can make changes and additions to your projects and activities. The first step is picking a client.
If you click add/edit projects in from the client list, you will not need to pick the client once you are on the projects and activities screen.
Once your client is chosen, select a project or click on the add project button on the bottom left. Once you have a new or existing project selected, the project editing form, and your default activities list will appear on the right side of the screen.
Projects and Activities screen:

The project edit form and the default activities list (step 3 in the screenshot above) will not appear until you select or add a project.
Now you can edit your project information, select existing activities available for this project, and/or add new activities to this project.
Whenever you add a new activities, the activity will become a permanent part of your default activity list, available to all past and future projects through the show/hide option, until you delete the activity from your default activity list.
Adding, editing and deleting a project
To add a new project, simply click the add new project button on the left side of the screen. Make sure to select a client first.
Once you've selected a project or chose to add a new project, you will be presented with the project edit form in the middle of the screen. All projects require a project name and a project code. The project code will appear in the drop-down lists when entering items in the time & sales screen. However, the project name will be used on invoices and on the history tabs of the time & sales screen. The project description is where you can input important comments about the project. The bill and pay rates for the project are important if you wish to override the client or worker rate for this particular project. Leave blank or zero if you wish to use the default client and/or worker rate.
To remove a project, simply click the disable link next to the project (on the left side of the screen).
Adding, Editing and Deleting Activities
You can choose which activities you would like to be available for this project by choosing the show option next to the activity name. If you would like a new activity to be added to your default list (at which point you can then choose to "show" it for this particular project), simply type it in at the bottom of the activity list and click save project. If you would like to have an override bill or pay rate for the new activity, you can type it in.
For billing override rates, the EnterYourHours.com system uses the following logic: if there is an activity override rate, the system will use that. If not, the system will check to see if there is a project override system, and if so, it will use that. If there is no project override rate, the system will check to see if there is a worker override rate. If there is no worker override rate, then the system will use the default billing rate for the client. For pay rates, the same basic logic is used. First the system checks the activity, then the project, then the client override rate, and finally will use the worker default pay rate.