Truly one of the most powerful features throughout the EnterYourHours.com System is the ability to filter, search and sort. Filtering, searching, and sorting on the Hours tab is similar to filtering, searching, and sorting on any other tab.
Sorting
To sort, click on the header for any of the following fields: Date, Client, Project, Worker, Description, Hours, Adjust, and Total. The first time you click on a header, the list will be sorted in ascending alphabetical order (A->Z) based on the column you clicked, and the second time you click the same column, the list will sort in descending order. Every time thereafter, will toggle between the two.
If you are changing sorts between multiple columns, keep in mind that clicking on another column will reset all other columns to sort ascending the next time they are clicked.
Filtering and Searching
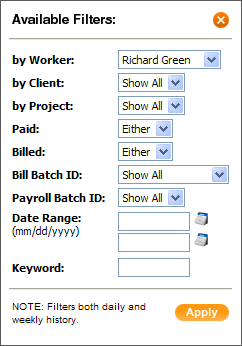
Filtering and searching is really the same thing, but it might help to think of each separately. Both are accomplished via the Filter form by clicking the Filter button on the History toolbar:
Filter Button on the History Toolbar:
 Filter
 Filter Form:

(Keep in mind that the filter will affect the results of all the tabs (Hours, Expenses, Adjustments, and Summary).
If you need to find a particular record, you might want to use the Key Word option, or you can input more extensive criteria by using other options in the Filter Form. However, you can also think of the Filter as an ad-hoc reporting tool. The Hours Tab also displays totals at the bottom, so you can use it for summarizing information. For example, perhaps you want to see how many hours your company has billed for a particular client across a certain date range. Or you might want to see the total number of hours a worker has billed for a particular client. Whether you are trying to pinpoint a particular record, or view lots of information at once, you will find the Filter Form a very useful tool.
There are many different way to filter your result. Below is a breakdown of all the filtering options:
Client: Either choose "Show All", which will include all the clients, or pick a particular client.
Be aware that selecting Show All for one option does not guarantee you that all items from the list will appear, if you apply specific filters for other options. For example, if put in a date range during which no work was done for a particular client, than that particular client will not show up in the Hours Tab, even if you choose "Show All" for clients.
Project: You will need to select a Client from the drop-down list. Once selected, the Project drop-down box will fill with choices for the projects that client has.
Paid: Depending on how you or other administrators are using the system (e.g. whether or not you or they are using the Payroll tab), this option will generally control whether you see Hours records that have been paid (choose Yes), not paid (choose No), or either. By choosing Either the EnterYourHours.com System will not filter on payment status at all.
Billed: The Billed option is similar to the Paid option but uses the billing status to determine which records are shown. This option will depend on how you or other administrators are using the system (e.g. whether or not you or they are using the Billing tab), and will generally control whether you see Hours records that have been billed (choose Yes), not billed (choose No), or either. By choosing Either the EnterYourHours.com System will not filter on billing status at all.
Bill Batch ID: For more information on this option see the Bill Batches topic under the Invoicing Screen section. In summary, there is an ID number assigned every time clients are billed and sometimes this option is handy for investigating hours associated with a particular billing cycle.
Payroll Batch ID: For more information on this option see the Payroll Batches topic under the Payroll section. In summary, there is an ID number assigned every time workers are paid and sometimes this option is handy for investigating hours associated with a particular payroll cycle.
Date Range: The Date Range option allows you to enter a beginning date, an ending date, or both a beginning and end date. If you only enter a beginning date, it will show hours worked beginning from that date, without limiting the end date. If you only put in an end date, it will show the hours worked up until that date without limiting the beginning date. This option applies to the date worked, not the date that the hours were entered.
Key Word: The Key Word option allows you to do a wildcard search on the work descriptions. If the word or phrase you enter is found anywhere in the work description, that record will be included with the results.