Project Integration with Quickbooks
We are going to assume that you've visited our Quickbooks Support Page and followed the steps
there to get started. This will
mean that you've run at least your first update using the Quickbooks Web Connector. It's also a good idea to take a look
at the Guide to Integrating Your Account Data with Quickbooks, which provides an
overview to the rest of the Quickbooks Integration Guides on this site. The Standard Integration with
Quickbooks Guide
will also cover some of the basics which aren't referenced in this guide.
We've created a project called Ecommerce Website under the client Supple Sunny Nutrition. In this particular scenario, it's assumed you have a particular Quickbooks Item that you want associated with this Ecommerce Website project. So let's walk through how to configure
the project to accomplish this. The first step is to create an EYH Billing Category and map it to the Quickbooks Item you want to be associated with your Ecommerce Website project.
Notice that we type Website Development in the box next to the Add New EYH Bill Category button.

The next step is to map this EYH Billing Category to the Quickbooks Item. First we click the Create Link option under Commands, and then we choose an available Quickbooks Item from the
dropdown box.

Finally, we need to edit the project and assign the Website Development billing category to the Ecommerce Website project.
Notice the form label says QB Category, but keep in mind that your EYH Billing Categories will be listed here. If you choose an EYH Billing Category that isn't mapped to
a Quickbooks Item, you will get a warning in the Quickbooks area of EYH, informing you to create a mapping for this EYH Bill Category.

In this scenario, we are going to assume that you've configured your invoices to group on project. In the screenshot below of the Invoice sub-tab of the Settings Area, you can see that we are grouping our invoices on projects. We
are also grouping on Billing Type.

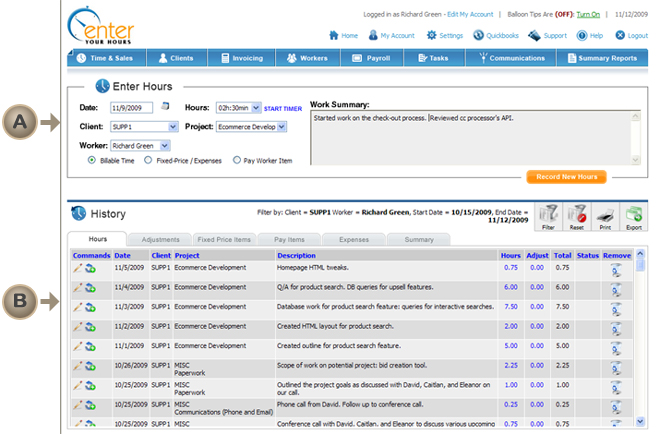
We made six time entries in the Time & Sales screen and two expense entries. In the screenshot below, the expense entries aren't shown, but
you can see that five of the time entries have been entered and are showing in Daily History ( ), and the sixth entry is about to be made (
 ).
The expense entries are not being shown in this screenshot. If you aren't sure how to enter time and expenses, see
the Time & Sales Screen help section.
).
The expense entries are not being shown in this screenshot. If you aren't sure how to enter time and expenses, see
the Time & Sales Screen help section.
Below is a screenshot of the invoice we created. Notice that the cover sheet area splits out the totals by both Billing Type and Project (). You can also see the project is split out in the detail section
under the Fees section () and the Expense section ( ). If you would like to know how to create an invoice from your Time & Sales entries, see
the help topic Overview of the Billing and Invoicing Process.
). If you would like to know how to create an invoice from your Time & Sales entries, see
the help topic Overview of the Billing and Invoicing Process.

All that's left to do is to mark the invoice for transfer and run the Quickbooks Web Connector. Below is a screenshot of the invoice as it appears in Quickbooks. Compare it to the EnterYourHours.com invoice.

For more information on getting started with the Quickbooks Web Connector, visit our Quickbooks Support Page.
We hope you've found this introductory guide useful. If you would like to schedule a walkthrough, you can do so by opening a support ticket with a phone number and a time you would like to be reached.
Support tickets are available for free trial account holders as well.