EYH has two different invoice document types. The basic Invoice configuration is turned on by default and simply shows the client a detail listing of all the work and the total cost.
The other invoice configuration is the Bill Document Type, which includes payment and balance information.
This example will show you how to invoice a single client using the Bill Document Type.
Document Settings
If you haven't set your Document Type to Bill yet, then our first step is to click on settings at the top right of the page and then navigate to the invoice settings screen by clicking the Settings Icon . Then clicking the third tab which is the Invoicing Sub Menu.

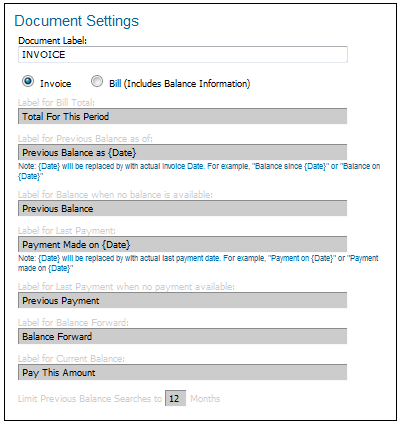
Once you reach the Invoice settings page the Document Settings window will be halfway down the page on the right. Below is a snapshot of the Document Settings window which is currently set to default. In order to change the Document Type to a bill you will select the bubble option next to invoice labeled "Bill". You will notice that the fields below the bubble options are greyed out which signify that they are uneditable with the current configuration. Once you set the document type to Bill you will then be able to customize the labels to your preferences. Make sure to save all changes before navigating to another page. If you wish to find out more about each individual field head over to our Invoice Settings page for a more in depth explanation of each individual field.
Creating Your Invoice
If you aren't already on the Invoicing Screen, click the Invoicing Tab in the top toolbar. At the top of the screen, under Unbilled Items heading, select and deselect the box inside the first column Header (Include). This will deselect all the checkboxes below. Now, select only the box of the client you wish to invoice. Click the  button. Once the system creates the bill batch, you will notice the new bill batch at the bottom of your screen under the Bill Batches Tab in the Accounting Center.
Click the plus sign next to the new Bill Batch that you just created (it will be at the top of the list). The bill batch will open up to show you the clients underneath. In this sample, there should be only one client. You can click the plus sign next to the client to see detailed information on each worker for this client.
At the end of the row containing the client, click the Create Invoice link under the Commands column. Once your invoice is created you can view it in PDF format (click view) and from the PDF file you can print it or save it on your computer. You can also edit the invoice and add additional line items for the client (click Edit). You can also send the invoice to your client by clicking the Email Client link.
You will need to receive payments from your clients in order to show balance and payment information on the invoice. To learn to more about receiving payments see the
entering a payment page.